
How to Upload and Post Images to the Forum Using Servimg
3 posters
Page 1 of 1

How to Upload and Post Images to the Forum Using Servimg
![]() by Any1 Sat Feb 03, 2018 4:15 pm
by Any1 Sat Feb 03, 2018 4:15 pm
Hello there~
I thought I'd make a tutorial about how to post pictures along your posts in this forum for the people who are not in the known, now that our old method is gone.
Forums have always been designed to require third party image hosting websites to be able to post pictures directly onto a thread. The site we used before, and one of the biggest image hosting pictures in general, Photobucket, is no longer usable. From July 2017, Photobucket decided that free users could no longer link their images on third party sites, leaving places like Amazon, eBay, or a lot of forums with ugly ransom banners. This likely affected millions of users, who probably decided to stop using their services (for good reason). Our community is in the same boat. For a while people used sites like imgur to host their pictures, despite the lack of convenience when creating and managing folders.
Fortunately, thanks to forumotion, the new forum has an easy and free image hosting partner that is directly intregrated in the posting interface and makes posting images easier than ever.
Forums like this one don't use hmtl to create and format posts. Instead they use a language called BBCode which is simpler and more user friendly. The way to post pictures is by using (img) tags and the direct links of pictures you want to post. The post window makes things even easier by giving you buttons so you don't have to manually write these tags.
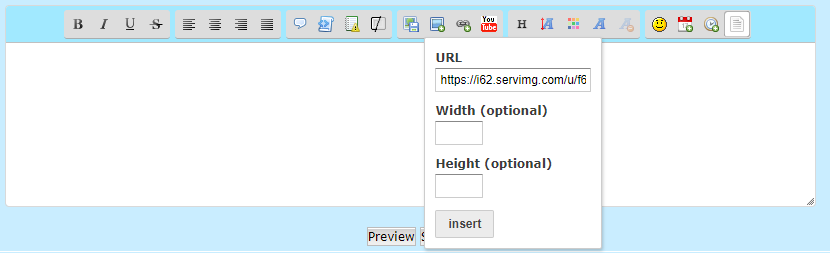
Click the "Insert Image" button.

The width and height fields are there in case you want to resize your picture so it fits the post better, in case it's too big. In the URL field you paste the direct link of the picture you want to post on a thread.
As I mentioned before, local paths don't work unless you're embedding a file to your post, which is something completely unrelated to this tutorial. You're gonna need somewhere to host your images on the web. Enter Servimg.
Servimg is yet another image hosting website, especifically created so that users can upload and organize their image files. Please note that this site only allows certain file extensions to be uploaded, and there's a 1MB file size limit for each picture. Pictures with .PNG, .JPG, .JPEG and .GIF extensions are allowed, and there's absolutely no limit as to how many images you can upload to your account as long as they fit those requirements. Since this is a roleplaying forum, it's exactly what we are asking for.
The main reason I'm recommending Servimg for image hosting, though, is because it's 100% integrated with this forum. This makes things even easier when it comes to uploading and organizing. Here's how to use it.
Say I'm reading a thread and there's a certain post I want to react to with a GIF. The GIF is saved directly on my computer, so I'm gonna have to upload it somewhere so I can post it. Here's what we're gonna do.
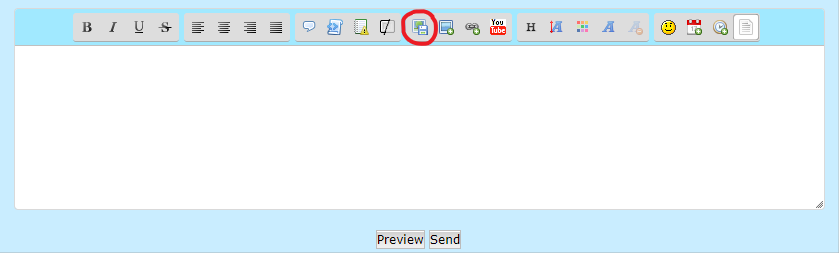
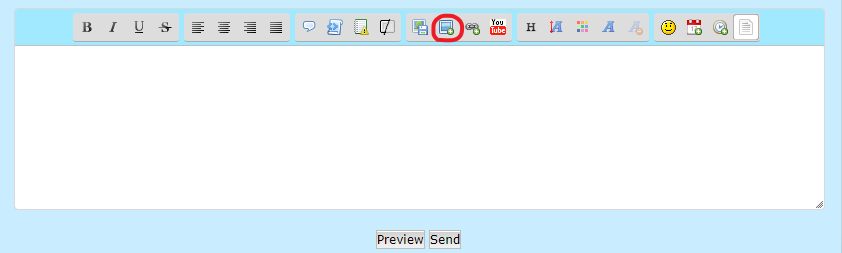
You're going to want to click the "Host an Image" button on your post console. Once you do so, you'll see something like this:
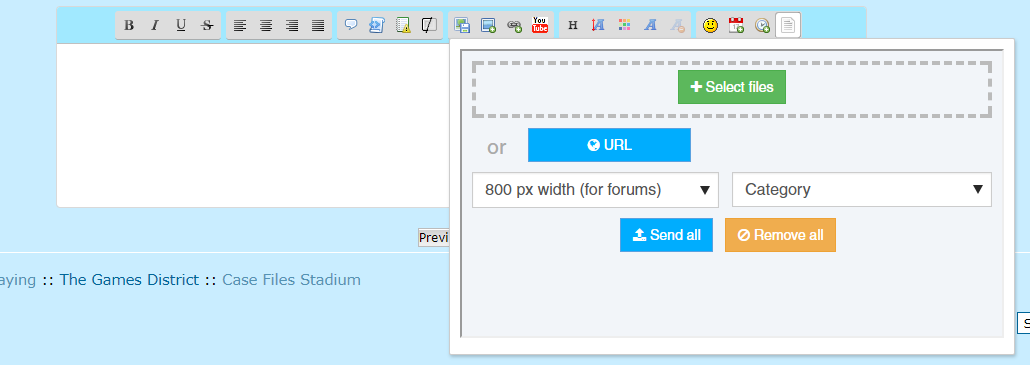
There's a lot to look at, but this is where you'll be doing most of the image uploading. Simply click "Select Files" and a Window will open asking you where the directory of the picture you want to upload is. You can also drag and drop the pictures if that's more up to your speed. Once you select your picture(s), you'll see something like this:
Your image hasn't been uploaded just yet. You'll have to adjust some settings before clicking on .
.
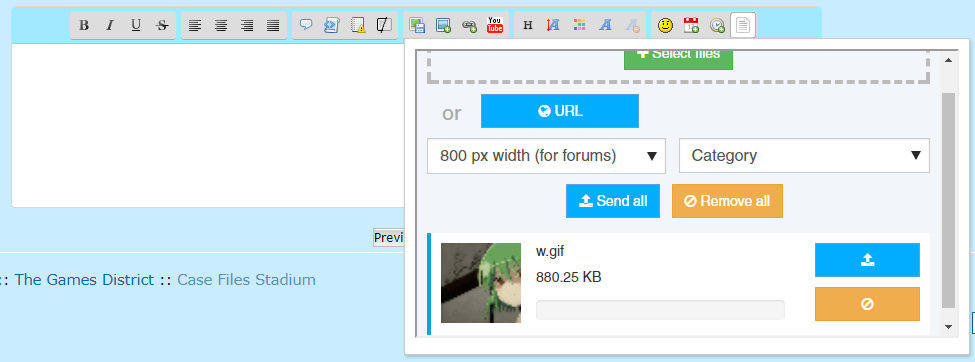
Once you're done adjusting the settings to your liking click the next to your picture to upload it to Servimg (or the Send all if you're uploading more than one image at once).
You've clicked Upload, and next to your picture a bunch of weird links have appeared like so:
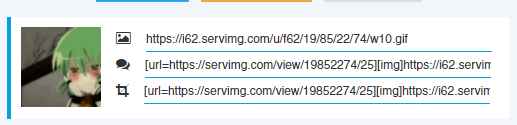
If you click on your picture or the Insert All button, your picture will automatically be added to your post, nothing else needed from your part. However, I'm not a fan of this option, since clicking on any picture inserted this way will take you to Servimg, opening a new window on your browser.
Instead, Copy the first of the three links you see next to your uploaded image. This is your direct link.
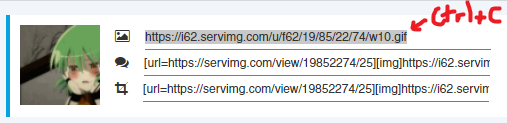
Now, paste that link on the Insert image URL field and click Insert.
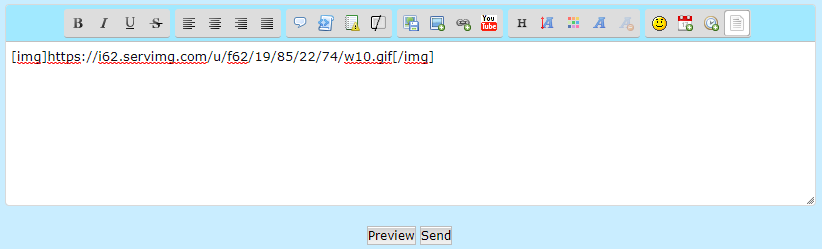
And you're done! If you click Preview you should see that your picture works perfectly.
This method is great for when you want to use the occasional image, like a reaction picture or an assorted meme you feel like adding to your post. It's fast and you don't have to worry about finding a link to that picture again. However, if you're roleplaying, you're going to want to use the same picture of your character many times, if the situation calls for it. That kind of image usage calls for organized image folders like most image hosting websites have. Needless to say, Servimg has this feature as well, but it can't be accessed from the forum.
Introducing our last part of the tutorial.
First thing I'll tell you to do is to bookmark [url=servimg.com]Servimg.com[/url], since you're going to be using it very often. It's not a very resource heavy website, that's for sure.
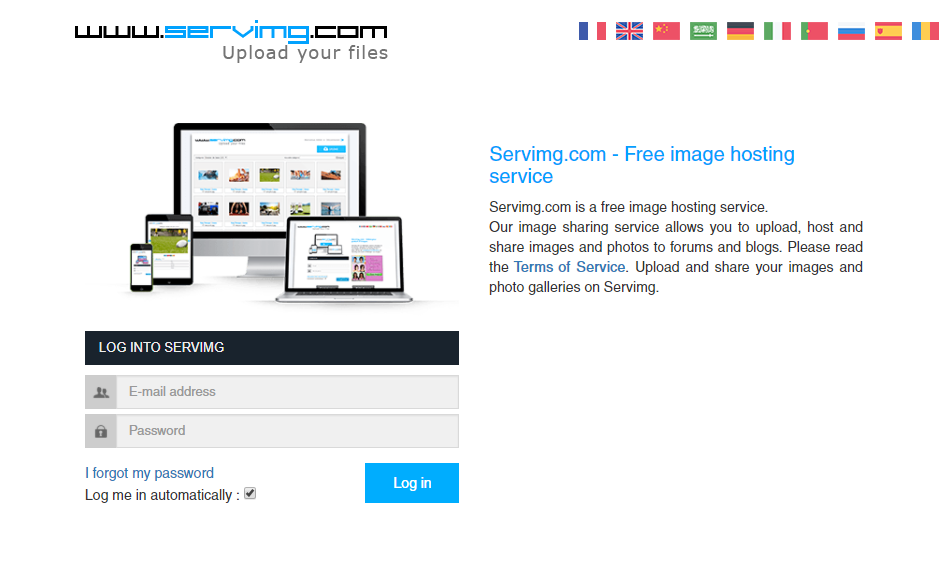
When you access it for the first time you'll have some questions: Do I have to register to use it? How do I access the pictures I've already uploaded with my forum account? Accessing your Servimg account couldn't be easier. Simply login with your Forum Credentials. That is the same username and password you use for Case Files.
Once you write in your forum credentials you'll receive an email about creating your Servimg account and you'll be redirected to your image folder:
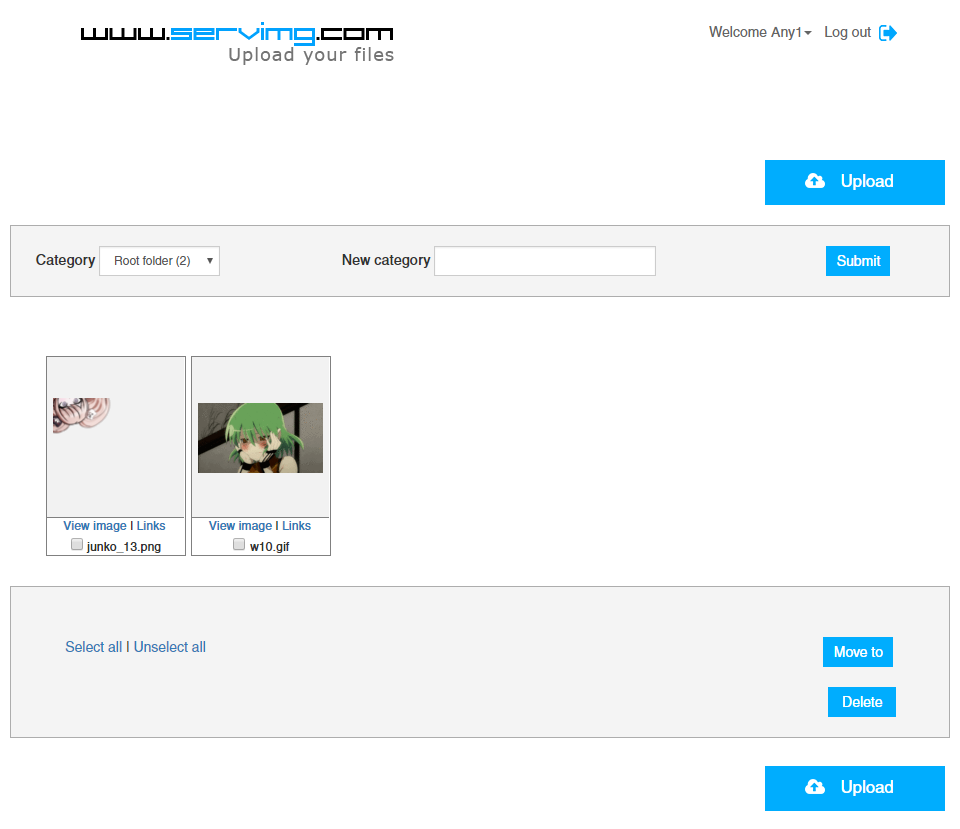
Wow! That's the picture I uploaded before!
That's right. This account is linked to your forum account and keeps all the images you upload to the forum safe. You can also upload, get direct links and delete pictures from here. Keep in mind that if you delete the pictures from here, all the times you've posted them on the forum will appear broken.
The point of uploading images from Servimg.com is to keep them organized. With Categories, you'll be able to create different folders for roleplaying.

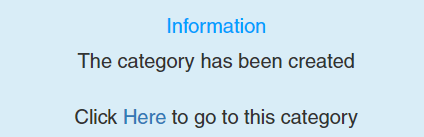
Simply type in the name of your new folder where it says New Category and click Submit. You'll get a message like this:
Once you have your new category, you can access it from your main page. Create categories for every character you play and make things easier on yourself!
This tutorial is pretty simple, but I hope it's useful and easy to understand. Personally, I was eskeptical at first when I heard of Servimg, but I have to say I'm impressed by what it offers. Sadly there's not an option to create Subcategories inside Categories, so all folders are dependent of your Root folder, but I can let it slide in exchange of a really easy, quick and free way of image hosting for roleplaying.
If you have any additional questions, I'll be happy to answer them.
See ya!
I thought I'd make a tutorial about how to post pictures along your posts in this forum for the people who are not in the known, now that our old method is gone.
Forums have always been designed to require third party image hosting websites to be able to post pictures directly onto a thread. The site we used before, and one of the biggest image hosting pictures in general, Photobucket, is no longer usable. From July 2017, Photobucket decided that free users could no longer link their images on third party sites, leaving places like Amazon, eBay, or a lot of forums with ugly ransom banners. This likely affected millions of users, who probably decided to stop using their services (for good reason). Our community is in the same boat. For a while people used sites like imgur to host their pictures, despite the lack of convenience when creating and managing folders.
Fortunately, thanks to forumotion, the new forum has an easy and free image hosting partner that is directly intregrated in the posting interface and makes posting images easier than ever.
1. The Basics.
Forums like this one don't use hmtl to create and format posts. Instead they use a language called BBCode which is simpler and more user friendly. The way to post pictures is by using (img) tags and the direct links of pictures you want to post. The post window makes things even easier by giving you buttons so you don't have to manually write these tags.
Click the "Insert Image" button.
The width and height fields are there in case you want to resize your picture so it fits the post better, in case it's too big. In the URL field you paste the direct link of the picture you want to post on a thread.
As I mentioned before, local paths don't work unless you're embedding a file to your post, which is something completely unrelated to this tutorial. You're gonna need somewhere to host your images on the web. Enter Servimg.
2. What is Servimg?
Servimg is yet another image hosting website, especifically created so that users can upload and organize their image files. Please note that this site only allows certain file extensions to be uploaded, and there's a 1MB file size limit for each picture. Pictures with .PNG, .JPG, .JPEG and .GIF extensions are allowed, and there's absolutely no limit as to how many images you can upload to your account as long as they fit those requirements. Since this is a roleplaying forum, it's exactly what we are asking for.
The main reason I'm recommending Servimg for image hosting, though, is because it's 100% integrated with this forum. This makes things even easier when it comes to uploading and organizing. Here's how to use it.
3. Using Servimg directly from the forum
Say I'm reading a thread and there's a certain post I want to react to with a GIF. The GIF is saved directly on my computer, so I'm gonna have to upload it somewhere so I can post it. Here's what we're gonna do.
You're going to want to click the "Host an Image" button on your post console. Once you do so, you'll see something like this:
There's a lot to look at, but this is where you'll be doing most of the image uploading. Simply click "Select Files" and a Window will open asking you where the directory of the picture you want to upload is. You can also drag and drop the pictures if that's more up to your speed. Once you select your picture(s), you'll see something like this:
Your image hasn't been uploaded just yet. You'll have to adjust some settings before clicking on
.- 800px width (for forums) refers to the size your image will be resized to. It's set to 800px by default so your pictures aren't obstrusive to other users, but I'd recommend leaving that on No. Hopefully the images you upload never exceed that width though, because I'll be wondering why you need such huge files for roleplaying.
- Category alludes to the Servimg folder your image will be uploaded to. I'll explain this in detail later, but it's pretty important to be organized if you're gonna upload reaction images for every character you roleplay. If you don't select any Category, the picture will simply upload to your Servimg Root folder.
Once you're done adjusting the settings to your liking click the
next to your picture to upload it to Servimg (or the Send all if you're uploading more than one image at once).You've clicked Upload, and next to your picture a bunch of weird links have appeared like so:
If you click on your picture or the Insert All button, your picture will automatically be added to your post, nothing else needed from your part. However, I'm not a fan of this option, since clicking on any picture inserted this way will take you to Servimg, opening a new window on your browser.
Instead, Copy the first of the three links you see next to your uploaded image. This is your direct link.
Now, paste that link on the Insert image URL field and click Insert.
And you're done! If you click Preview you should see that your picture works perfectly.
This method is great for when you want to use the occasional image, like a reaction picture or an assorted meme you feel like adding to your post. It's fast and you don't have to worry about finding a link to that picture again. However, if you're roleplaying, you're going to want to use the same picture of your character many times, if the situation calls for it. That kind of image usage calls for organized image folders like most image hosting websites have. Needless to say, Servimg has this feature as well, but it can't be accessed from the forum.
Introducing our last part of the tutorial.
4. Using Servimg from Servimg.com
First thing I'll tell you to do is to bookmark [url=servimg.com]Servimg.com[/url], since you're going to be using it very often. It's not a very resource heavy website, that's for sure.
When you access it for the first time you'll have some questions: Do I have to register to use it? How do I access the pictures I've already uploaded with my forum account? Accessing your Servimg account couldn't be easier. Simply login with your Forum Credentials. That is the same username and password you use for Case Files.
Once you write in your forum credentials you'll receive an email about creating your Servimg account and you'll be redirected to your image folder:
Wow! That's the picture I uploaded before!
That's right. This account is linked to your forum account and keeps all the images you upload to the forum safe. You can also upload, get direct links and delete pictures from here. Keep in mind that if you delete the pictures from here, all the times you've posted them on the forum will appear broken.
The point of uploading images from Servimg.com is to keep them organized. With Categories, you'll be able to create different folders for roleplaying.
Simply type in the name of your new folder where it says New Category and click Submit. You'll get a message like this:
Once you have your new category, you can access it from your main page. Create categories for every character you play and make things easier on yourself!
5. Final Thoughts
This tutorial is pretty simple, but I hope it's useful and easy to understand. Personally, I was eskeptical at first when I heard of Servimg, but I have to say I'm impressed by what it offers. Sadly there's not an option to create Subcategories inside Categories, so all folders are dependent of your Root folder, but I can let it slide in exchange of a really easy, quick and free way of image hosting for roleplaying.
If you have any additional questions, I'll be happy to answer them.
See ya!

Any1- The Ultimate Final Poster

- Posts : 70
Join date : 2018-01-31
Age : 28
Location : Spain
Re: How to Upload and Post Images to the Forum Using Servimg
![]() by Nenilein Sat Feb 03, 2018 6:05 pm
by Nenilein Sat Feb 03, 2018 6:05 pm
Hah, thank you so much for making this, Any! This is gonna be super-helpful!
Great work and a star to you~!
Great work and a star to you~!

Nenilein- Admin
- Posts : 261
Join date : 2018-01-30
Age : 32
Location : Austria -

Re: How to Upload and Post Images to the Forum Using Servimg
![]() by Chlobo Sun Feb 04, 2018 9:20 pm
by Chlobo Sun Feb 04, 2018 9:20 pm
Very helpful guide. And I like the forum's uploading system.

Chlobo- Posts : 29
Join date : 2018-02-04
Age : 31
Location : UK -
» Peachy's Art Forum!
» New forum, new participation?
» I'm actually joining a forum again? Wow.
» My Ships Are Trash: The Forum Game
» Giggles joins forum, draws line, more at 11.
» New forum, new participation?
» I'm actually joining a forum again? Wow.
» My Ships Are Trash: The Forum Game
» Giggles joins forum, draws line, more at 11.
Page 1 of 1
Permissions in this forum:
You cannot reply to topics in this forum